Muon Development Documentation
Muon is a decentralized optimistic oracle network that carries out data requests from any source. It acts as a unique inter-blockchain data-availability network that makes messaging and secure data interfacing possible between different chains that are otherwise incompatible.
Contents
Introduction to Muon Apps
What is a Muon App?
Apps in the decentralized environment, called dApps, are made up of a smart contract and a client, that is, a frontend user interface. There are, however, dapps that need an extra component to provide data from off-chain sources, i.e. an oracle. DApps for different purposes have different oracles that read and process data from sources and return signed responses.
At a first glance, one might think that developing an oracle is the simplest stage in developing a dApp; all there is to do is implementing a function that fetches and processes data to generate a signed output suitable to be fed to its smart contract.
However, it is not that simple. Data feeds provided by oracles are vulnerable to attacks and manipulation. The server on which an oracle component is run may be hacked and the private key used to sign data feeds can be abused to feed manipulated data to the smart contract. This is why, in addition to developing a simple oracle function, dApps need to deal with implementing solutions for complicated security issues.
As a viable alternative, dApps can focus on the development of the oracle function as a Muon app and depend on the multi-layer security scheme that Muon has devised. In simple words, a Muon app refers to an oracle app that is deployed and runs on the Muon network to fetch and process data and generate an output that can be fed to a smart contract reliably.
A Simple Oracle App
Muon apps are currently developed in JS; other programming languages will gradually be added. Here is a sample oracle app whose job is to fetch the price of ETH from Coinbase API.
const { axios } = MuonAppUtils

module.exports = {
  APP_NAME: 'simple_oracle',

  onRequest: async function(request){
    let { method } = request
    switch (method) {
      case 'eth-price':
        const response = await axios.get('https://api.coinbase.com/v2/exchange-rates?currency=ETH')
        return {
          price: parseInt(response.data['rates']['USD']),
        }

      default:
        throw `Unknown method ${method}`
    }
  },

  signParams: function(request, result){
    let { method } = request;
    let { price } = result;
    switch (method) {
      case 'eth-price':
        return [
          { type: 'uint256', value: price }
        ]
      default:
        throw `Unknown method ${method}`
    }
  }
}
A Muon app is a module that exports two functions: onRequest and signParams. The first fetches data, does any necessary processing and returns any data needed to be fed to the smart contract. The second function lists all the parameters that are to be included in the signed message and their types.
Deploying the App
Having prepared the simple oracle app, the developer needs to run a local network to test it. There are two prerequisites that should be installed: Mongo and Redis. After these two have been installed, the following steps should be followed to run the network.
The first step is to clone Muon node’s repository and checkout the testnet branch through:
$ git clone [email protected]:muon-protocol/muon-node-js.git --recurse-submodules
$ cd muon-node-js
$ git checkout testnet
The next step is to install required node modules as follows:
$ npm install
The network should be initialized using a number of nodes. For instance, a network of 4 nodes is created with the following command, where a request can be signed with 3 of them.
$ npm run devnet-init -- -t=3 -n=4 -infura=<your-infura-project-id>
As many Muon apps need to connect to Ethereum Mainnet and its sidechains, the developer’s Infura project ID should be added as well. The developer should then place the app in the apps/general/ folder and run the network with this command:
$ npm run devnet-run -- -n=3
The first time the app is run, it should be deployed on the network. To do so, use the following commands:
$ ./node_modules/.bin/ts-node ./src/cmd config set url "http://localhost:8000/v1"
$ ./node_modules/.bin/ts-node ./src/cmd app deploy "simple_oracle"
Now that the app has been deployed, the developer can query the app and get signed responses from it. To query the app, curl, for instance, can be use
$ curl "http://localhost:8000/v1/?app=simple_oracle&method=eth-price"
Note
When the testing is done and the app is about to be deployed on the public networks, the following steps should be observed:
Muon apps repository is forked.
The app is added to the forked repository.
A pull request is submitted to the repository
With this process, the app will be reviewed and added to Muon apps.
Verifying Signatures on the Contract
The TSS which Muon network generates is of Schnorr type and there are no built-in functions on Ethereum for its verification. There are, however, libraries that help verify the signature with a small amount of gas fee. Muon has provided such a library for dApps using Muon. These should import it into their smart contracts, inherit the MuonClient contract available here, and use the muonVerify function to verify the signature. Here is a sample:
// SPDX-License-Identifier: MIT
   pragma solidity ^0.8.0;

   import "@openzeppelin/contracts/utils/cryptography/ECDSA.sol";

   import "./MuonClient.sol";

   contract SampleApp is MuonClient {
       using ECDSA for bytes32;

       constructor(
           uint256 _muonAppId,
           PublicKey memory _muonPublicKey
       ) MuonClient(_muonAppId, _muonPublicKey){

       }

       function verifyTSS(
           uint256 price,
           bytes calldata reqId,
           SchnorrSign calldata sign
       ) public{
           bytes32 hash = keccak256(
               abi.encodePacked(
                   muonAppId,
                   reqId,
                   price
               )
           );
           bool verified = muonVerify(reqId, uint256(hash), sign, muonPublicKey);
           require(verified, "TSS not verified");
       }
   }
In addition to the TSS layer, Muon network has another security layer called Shield Nodes. A shield node makes use of Elliptic Curve Digital Signature Algorithm (ECDSA) signature which can be verified by built-in functions on Ethereum.
...
contract SampleApp is MuonClient {

    address shieldNode = msg.sender; // by default
    ...
    function verifyTSSAndShieldNode(
        uint256 price,
        bytes calldata reqId,
        SchnorrSign calldata sign,
        bytes calldata shieldNodeSign
    ) public {
        bytes32 hash = keccak256(
            abi.encodePacked(
                muonAppId,
                reqId,
                price
            )
        );
        bool verified = muonVerify(reqId, uint256(hash), sign, muonPublicKey);
        require(verified, "TSS not verified");

        hash = hash.toEthSignedMessageHash();
        address signer = hash.recover(shieldNodeSign);
        require(signer == shieldNode, "Shield node is not valid");

    }
}
This sample illustrates how shield node signature can be verified in addition to threshold signature in one function call.
Structure of a Muon App
Functions
onRequest
It is the most important function that every app should implement. This function receives the request as an argument, fetches required data from external sources, does any necessary processing and returns any data needed to be fed to the smart contract. request has different attributes.
onRequest: async function (request) {
    let {
      method,
      data: { params }
    } = request
    ...
}
The first one is the method that the user has called. Muon apps can have different methods, each of which should be separately handled in the onRequest function. The second one is data that, in turn, has an attribute called params which includes the parameters that are to be passed to the called method.
The simple oracle app mentioned in section 1b returns the price of ETH in terms of USD. If we are to expand the usage of the app to be able to return the price of any given token in terms any unit supported by Coinbase API, token and unit should be passed to the app the following way:
/?app=simple_oracle&method=price¶ms[token]=ETH¶ms[unit]=USD
In onRequest, parameters can be received and used in the following way:
onRequest: async function(request){
    let {
      method,
      data: { params }
    } = request
    let { token, unit } = params
    switch (method) {
      case 'price':
        const response = await axios.get(`https://api.coinbase.com/v2/exchange-rates?currency=${token}`)
        return {
          price: parseInt(response.data['rates'][unit]),
        }

      default:
        throw { message: `Unknown method ${method}` }
    }
}
signParams
This is another function that all Muon apps should implement. This method returns a list of all the parameters that are to be included in the signed message and their types. The type of each element defines how each should be encoded and included in the signed message. The available types are int256, uint256, bytes256, address, and string. The first three types support size variations 8, 16, 32, 64, 128 as well. Muon core packs appId, requestId and the current list, and uses its hash as the message that should be signed.
Warning
To ensure that the signed and verified response has accurately covered the requested data, the parameters passed to the app should also be included in the returned value of signParams in addition to the result. Otherwise, the signature queried from the app with certain parameters might be abused and fed to the dApp contract with different ones. If the app has different methods, the method name should be included as well.
If the simple oracle app is to be expanded to contain the token and unit parameters, the signParams should be updated as follows:
signParams: function(request, result){
  let {
    method,
    data: { params }
  } = request
  let { token, unit } = params
  let { price } = result;
  switch (method) {
    case 'price':
      return [
        { type: 'uint32', value: price },
        { type: 'string', value: token },
        { type: 'string', value: unit },
      ]
    default:
      throw `Unknown method ${method}`
  }
}
How to Use Gateway Data
For certain use-cases such as getting token prices, the requested data from the TSS network fluctuates momentarily. Obtaining the token price from Coinbase API in the simple oracle app is one such case. The price may fluctuate numerous times in one or two seconds, so the obtained data from different nodes in the TSS network may differ slightly. However, to generate the threshold signature, all nodes should sign exactly the same data.
To address this problem, Muon’s TSS network makes use of the following data-obtaining procedure. The node that receives the data request from the client, the gateway node, obtains required data, and then shares it with others in the TSS group. The other nodes obtain the required data and compare it with the data from the gateway node. If their obtained data is within a predefined range of the gateway data, they sign the data from the gateway node, not their own data. Finally, the gateway node aggregates the signatures and generates the threshold signature. This way, the threshold signature is on one set of data that was initially obtained by the gateway node.
For such applications, signParams should include the data provided by the gateway node instead of its own price if its own data is marginally different from that of the gateway. Otherwise, it rejects the request. So signParams should be updated as following:
const gatwayPrice = request.data?.result?.price || price;
if (100 * Math.abs(price - gatewayPrice) / price > 0.5) {
  throw 'invalid price'
}
return [
  { type: 'uint32', value: gatewayPrice },
  { type: 'string', value: token },
  { type: 'string', value: unit },
]
The request.data?.result?.price is undefined when it is evaluated on the gateway node; if not, its value is that of the gateway node’s. The price from the gateway node is verified only if the margin is lower than 0.5%.
Another essential piece of data that should be added to the returned list of signParams in some applications is the request’s timestamp. If the timestamp is not included for a token price, for instance, an old price signed a long time ago may be fed into the dApp. The points explained above are also true about timestamps; that is, the times when different nodes receive requests may differ slightly. So all nodes need to sign the gateway node’s time. Gateway time can be accessed via request.data.timestamp.
Timestamp deviation does not need to be manually verified in the code the way that is done for price. When a node receives a request from the gateway node, it checks request.data.timestamp whether the time gap is not more than 30 seconds. Otherwise, it rejects the request. So it is sufficient to include request.data.timestamp in the returned list of signParams the following way.
return [
  { type: 'uint32', value: gatewayPrice },
  { type: 'string', value: token },
  { type: 'string', value: unit },
  { type: 'uint32', value: request.data.timestamp },
]
Memory
Although the Muon oracle network is stateless, there are applications that need TTL-based caching. Suppose the simple oracle app is to limit the number of requests to Coinbase API and cache the response for a short period, for example 5 seconds. The readLocalMem and writeLocalMem functions as follows:
let data = await this.readLocalMem(`price-${token}`)
if (!data) {
  const response = await axios.get(`https://api.coinbase.com/v2/exchange-rates?currency=${token}`)
  data = JSON.stringify(response.data)
  await this.writeLocalMem(`price-${token}`, [{type: "string", value: data}], 5)
}
data = JSON.parse(data)
return {
  price: parseInt(data['rates'][unit]),
}
One of the use-cases of these functions is the implementation of a locking system. To do so, reading and writing cannot be run separately because if there are two concurrent requests, they may both acquire the lock simultaneously. To solve this problem, { getset: true } can be passed to writeLocalMem. Doing so, the writeLocalMem first reads the value prior to its writing and returns it. This assures that reading and writing occur in an atomic way.
const alreadyLocked = await this.writeLocalMem(
`lock-${user}`,
  [{ type: "bool", value: true }],
  5,
  { getset: true }
);
if (alreadyLocked) throw user locked;
// the code block requires acquiring the lock
Utilities
Developers can use MuonAppUtils to access available utilities for developing Muon apps.
const { axios } = MuonAppUtils
Here is the list of available utilities:
const axios = require('axios')
const Web3 = require('web3')
const tron = require('../utils/tron')
const { flatten, groupBy } = require('lodash')
const { BigNumber } = require('bignumber.js')

const { toBaseUnit } = require('../utils/crypto')
const { timeout, floatToBN } = require('../utils/helpers')
const util = require('ethereumjs-util')
const ws = require('ws')
const ethSigUtil = require('eth-sig-util')
const {
  getBlock: ethGetBlock,
  getBlockNumber: ethGetBlockNumber,
  getPastEvents: ethGetPastEvents,
  read: ethRead,
  call: ethCall,
  getTokenInfo: ethGetTokenInfo,
  getNftInfo: ethGetNftInfo,
  hashCallOutput: ethHashCallOutput
} = require('../utils/eth')

const soliditySha3 = require('../utils/soliditySha3');

const { multiCall } = require('../utils/multicall')
const { BNSqrt } = require('../utils/bn-sqrt')

global.MuonAppUtils = {
  axios,
  Web3,
  flatten,
  groupBy,
  tron,
  ws,
  timeout,
  BN: Web3.utils.BN,
  BigNumber,
  toBN: Web3.utils.toBN,
  floatToBN,
  multiCall,
  ethGetBlock,
  ethGetBlockNumber,
  ethGetPastEvents,
  ethRead,
  ethCall,
  ethGetTokenInfo,
  ethGetNftInfo,
  ethHashCallOutput,
  toBaseUnit,
  soliditySha3,
  ecRecover: util.ecrecover,
  recoverTypedSignature: ethSigUtil.recoverTypedSignature,
  recoverTypedMessage: ethSigUtil.recoverTypedMessage,
  BNSqrt: BNSqrt
}
end
TWAPER (Price Feed App)
Twaper is a Muon app to get a token price from decentralized exchanges in a way that is secure against price manipulations. It uses the Uniswap TWAP approach with the following extra benefits over the original on-chain implementation:
It detects and removes outlier prices before calculating averages to prevent price manipulations through applying a sharp rise/fall in the price for a short duration.
In order to reject unexpected price changes, it applies a fuse mechanism that stops the system when a short duration average shows a large price volatility compared to a longer one.
It does not require periodic transactions to register checkpoints on-chain which are costly and hard to maintain.
This document describes how Twaper is developed, and is made up of four sections:
In the first section, we describe how a module is developed to calculate TWAP of a pair of tokens based on the information it gets from a Uniswap pool or one of its forks.
In this section, we explain how to use the module from section one to obtain a token’s price from routes made of pairs that end with a stablecoin. These routes can be in different exchanges on different chains.
In section 3, we demonstrate how the TWAP of an LP token is calculated using the procedure in section 2.
This section explains how a request is processed by the app.
NB: Throughout this document, pair price refers to the price of one token in terms of the other.
Calculating TWAP of a Pair
Obtaining Price Changes
To calculate Time Weighted Average Price for a pair in a time period, the token prices should be obtained for each block in the period. One approach might be to call getReserves for each block, calculate the price for the block by dividing _reserve1 to _reserve0, and calculate the average of all the prices.
Following such an approach is a time-consuming and costly procedure because it requires numerous calls to the blockchain RPC endpoint. For instance, if we need the average for a 30-minute period for a network with 15-second blocks, there should be 120 calls of getReserves.
To solve this problem, a single request is sent to query all Sync events that are emitted each time the reserves are updated due to minting, burning and swapping.
getSyncEvents: async function (chainId, seedBlockNumber, pairAddress, blocksToSeed) {
        const w3 = networksWeb3[chainId]
        const pair = new w3.eth.Contract(UNISWAPV2_PAIR_ABI, pairAddress)
        const options = {
            fromBlock: seedBlockNumber + 1,
            toBlock: seedBlockNumber + blocksToSeed
        }
        const syncEvents = await pair.getPastEvents("Sync", options)
When there is more than one change in a block’s reserves, only the final should be considered and the others are excluded.
let syncEventsMap = {}
    // {key: event.blockNumber => value: event}
    syncEvents.forEach((event) => syncEventsMap[event.blockNumber] = event)
    return syncEventsMap
},
Listing the Price for Each Block
Now there is a list of all the blocks in which reserves have changed and the values of the reserves in those blocks for the defined time period. To calculate the TWAP, a list of prices is needed that shows the final price in each block. To generate this list, we require the initial reserve state in the seed block in addition to the list of reserves values.
getSeed: async function (chainId, pairAddress, blocksToSeed, toBlock) {
    const w3 = networksWeb3[chainId]
    const seedBlockNumber = toBlock - blocksToSeed

    const pair = new w3.eth.Contract(UNISWAPV2_PAIR_ABI, pairAddress)
    const { _reserve0, _reserve1 } = await pair.methods.getReserves().call(seedBlockNumber)
    const price0 = this.calculateInstantPrice(_reserve0, _reserve1)
    return { price0: price0, blockNumber: seedBlockNumber }
},
At this stage, the initial state and list of reserves values are available, so the price list can be generated.
createPrices: function (seed, syncEventsMap, blocksToSeed) {
    let prices = [seed.price0]
    let price = seed.price0
    // fill prices and consider a price for each block between seed and current block
    for (let blockNumber = seed.blockNumber + 1; blockNumber <= seed.blockNumber + blocksToSeed; blockNumber++) {
        // use block event price if there is an event for the block
        // otherwise use last event price
        if (syncEventsMap[blockNumber]) {
            const { reserve0, reserve1 } = syncEventsMap[blockNumber].returnValues
            price = this.calculateInstantPrice(reserve0, reserve1)
        }
        prices.push(price)
    }
    return prices
},
Each pair is made up of two tokens. To calculate the price of token0 in terms of token1 from the reserves, reserve1 should be divided by reserve0. As there are no floating point numbers in Solidity, and price may be a floating point number, a quotient named Q112 is used to retain the precision of the price by multiplying it by 2^112.
calculateInstantPrice: function (reserve0, reserve1) {
    // multiply reserveA into Q112 for precision in division
    // reserveA * (2 ** 112) / reserverB
    const price0 = new BN(reserve1).mul(Q112).div(new BN(reserve0))
    return price0
},
Detecting Outliers
Before calculating the average, prices that are potentially the result of manipulation should be detected and removed from the list. This is technically called outlier detection. At present, a simple algorithm called Z-score is used for outlier detection.
The Z-score measures how far a data point is away from the mean as a multiple of the standard deviation (std). In simple words, it indicates how many standard deviations an element is from the mean, so
z_score = abs(x - mean) / std
This means any price with a Z-score higher than the threshold will be considered an outlier and excluded from the final average.
std: function (arr) {
    let mean = arr.reduce((result, el) => result + el, 0) / arr.length
    arr = arr.map((k) => (k - mean) ** 2)
    let sum = arr.reduce((result, el) => result + el, 0)
    let variance = sum / arr.length
    return Math.sqrt(variance)
},

removeOutlierZScore: function (prices) {
    const mean = this.calculateAveragePrice(prices)
    // calculate std(standard deviation)
    const std = this.std(prices)
    if (std == 0) return prices

    // Z score = abs(price - mean) / std
    // price is not reliable if Z score > threshold
    return prices.filter((price) => Math.abs(price - mean) / std < THRESHOLD)
},
For outlier detection based on Z-score, the price logarithm is used because price is logarithmic in nature. Essentially, using the log of prices can better show the viewer the rate of change over time. If prices are considered linearly, price change from 1 to 2 equals price change from 1001 to 1002. In logarithmic viewpoint, however, these two changes are clearly different.
The process of removing outliers is done twice. Calculating the average including outliers makes the average and the resulting standard deviation biased. Repeating the outlier detection process after cleaning the data set by removing any obviously outlying prices in the first run assures us that more subtle outliers can be detected as well. Although this approach may cause the removal of prices that are not the result of price manipulation, it drastically reduces the chances of not detecting a manipulated price.
removeOutlier: function (prices) {
    const logPrices = []
    prices.forEach((price) => {
        logPrices.push(Math.log(price));
    })
    let logOutlierRemoved = this.removeOutlierZScore(logPrices)

    logOutlierRemoved = this.removeOutlierZScore(logOutlierRemoved)

    const outlierRemoved = []
    const removed = []
    prices.forEach((price, index) => logOutlierRemoved.includes(logPrices[index]) ? outlierRemoved.push(price) : removed.push(price.toString()))

    return { outlierRemoved, removed }
},
Now we have all the necessary data to calculate the average. To make the process simpler, only the price of token0 in terms of token1 has been calculated so far. However, each pair is made of two tokens, each of which has a price in terms of the other and is the other’s reverse. Mathematically, the average of the reverses of multiple numbers does not equal the reverse of their average. That is why we need to calculate all the reverses and then their average to obtain the time weighted average price of token1 in terms of token0.
calculateAveragePrice: function (prices, returnReverse) {
    let fn = function (result, el) {
        return returnReverse ? { price0: result.price0.add(el), price1: result.price1.add(Q112.mul(Q112).div(el)) } : result + el
    }
    const sumPrice = prices.reduce(fn, returnReverse ? { price0: new BN(0), price1: new BN(0) } : 0)
    const averagePrice = returnReverse ? { price0: sumPrice.price0.div(new BN(prices.length)), price1: sumPrice.price1.div(new BN(prices.length)) } : sumPrice / prices.length
    return averagePrice
},
Applying Fuse Mechanism
Having removed the outliers, the short-term average is generated. At this stage, a fuse mechanism is implemented, through which the short-term average is compared with a longer-term average that acts as a fuse price. If the result of the comparison shows a large difference, the fuse mechanism stops the system.
The fact that we make use of different methods for the calculation of short and long-term averages heightens the app’s reliability; if there is a bug in one of the methods or an attack that influences one of them, the other can cover it.
checkFusePrice: async function (chainId, pairAddress, price, fusePriceTolerance, blocksToFuse, toBlock, abiStyle) {
    const w3 = networksWeb3[chainId]
    const seedBlock = toBlock - blocksToFuse

    const fusePrice = await this.getFusePrice(w3, pairAddress, toBlock, seedBlock, abiStyle)
    if (fusePrice.price0.eq(new BN(0)))
        return {
            isOk0: true,
            isOk1: true,
            priceDiffPercentage0: new BN(0),
            priceDiffPercentage1: new BN(0),
            block: fusePrice.blockNumber
        }
    const checkResult0 = this.isPriceToleranceOk(price.price0, fusePrice.price0, fusePriceTolerance)
    const checkResult1 = this.isPriceToleranceOk(price.price1, Q112.mul(Q112).div(fusePrice.price0), fusePriceTolerance)

    return {
        isOk0: checkResult0.isOk,
        isOk1: checkResult1.isOk,
        priceDiffPercentage0: checkResult0.priceDiffPercentage,
        priceDiffPercentage1: checkResult1.priceDiffPercentage,
        block: fusePrice.blockNumber
    }
},
Calculating Fuse Price
To calculate the long-term average needed for the fuse mechanism, we use the off-chain implementation of the exact method that DEXes use to calculate on-chain TWAP.
Some Uniswap forks have made modifications to the on-chain TWAP calculation method originally made by Uniswap. In this app, the original Uniswap version and a well-known fork, Solidly, are implemented.
getFusePrice: async function (w3, pairAddress, toBlock, seedBlock, abiStyle) {
    const getFusePriceUniV2 = async (w3, pairAddress, toBlock, seedBlock) => {
        ...
    }
    const getFusePriceSolidly = async (w3, pairAddress, toBlock, seedBlock) => {
        ...
    }
    const GET_FUSE_PRICE_FUNCTIONS = {
        UniV2: getFusePriceUniV2,
        Solidly: getFusePriceSolidly,
    }

    return GET_FUSE_PRICE_FUNCTIONS[abiStyle](w3, pairAddress, toBlock, seedBlock)
},
In this doc, only the original Uniswap implementation is explained. To calculate the long-term average, we make use of the two variables price0CumulativeLast & price1CumulativeLast that are available on the pair contract for on-chain TWAP calculations.
const getFusePriceUniV2 = async (w3, pairAddress, toBlock, seedBlock) => {
     ...
}
Here is the method that Uniswap has proposed for calculating time-weighted average called V2 solution:
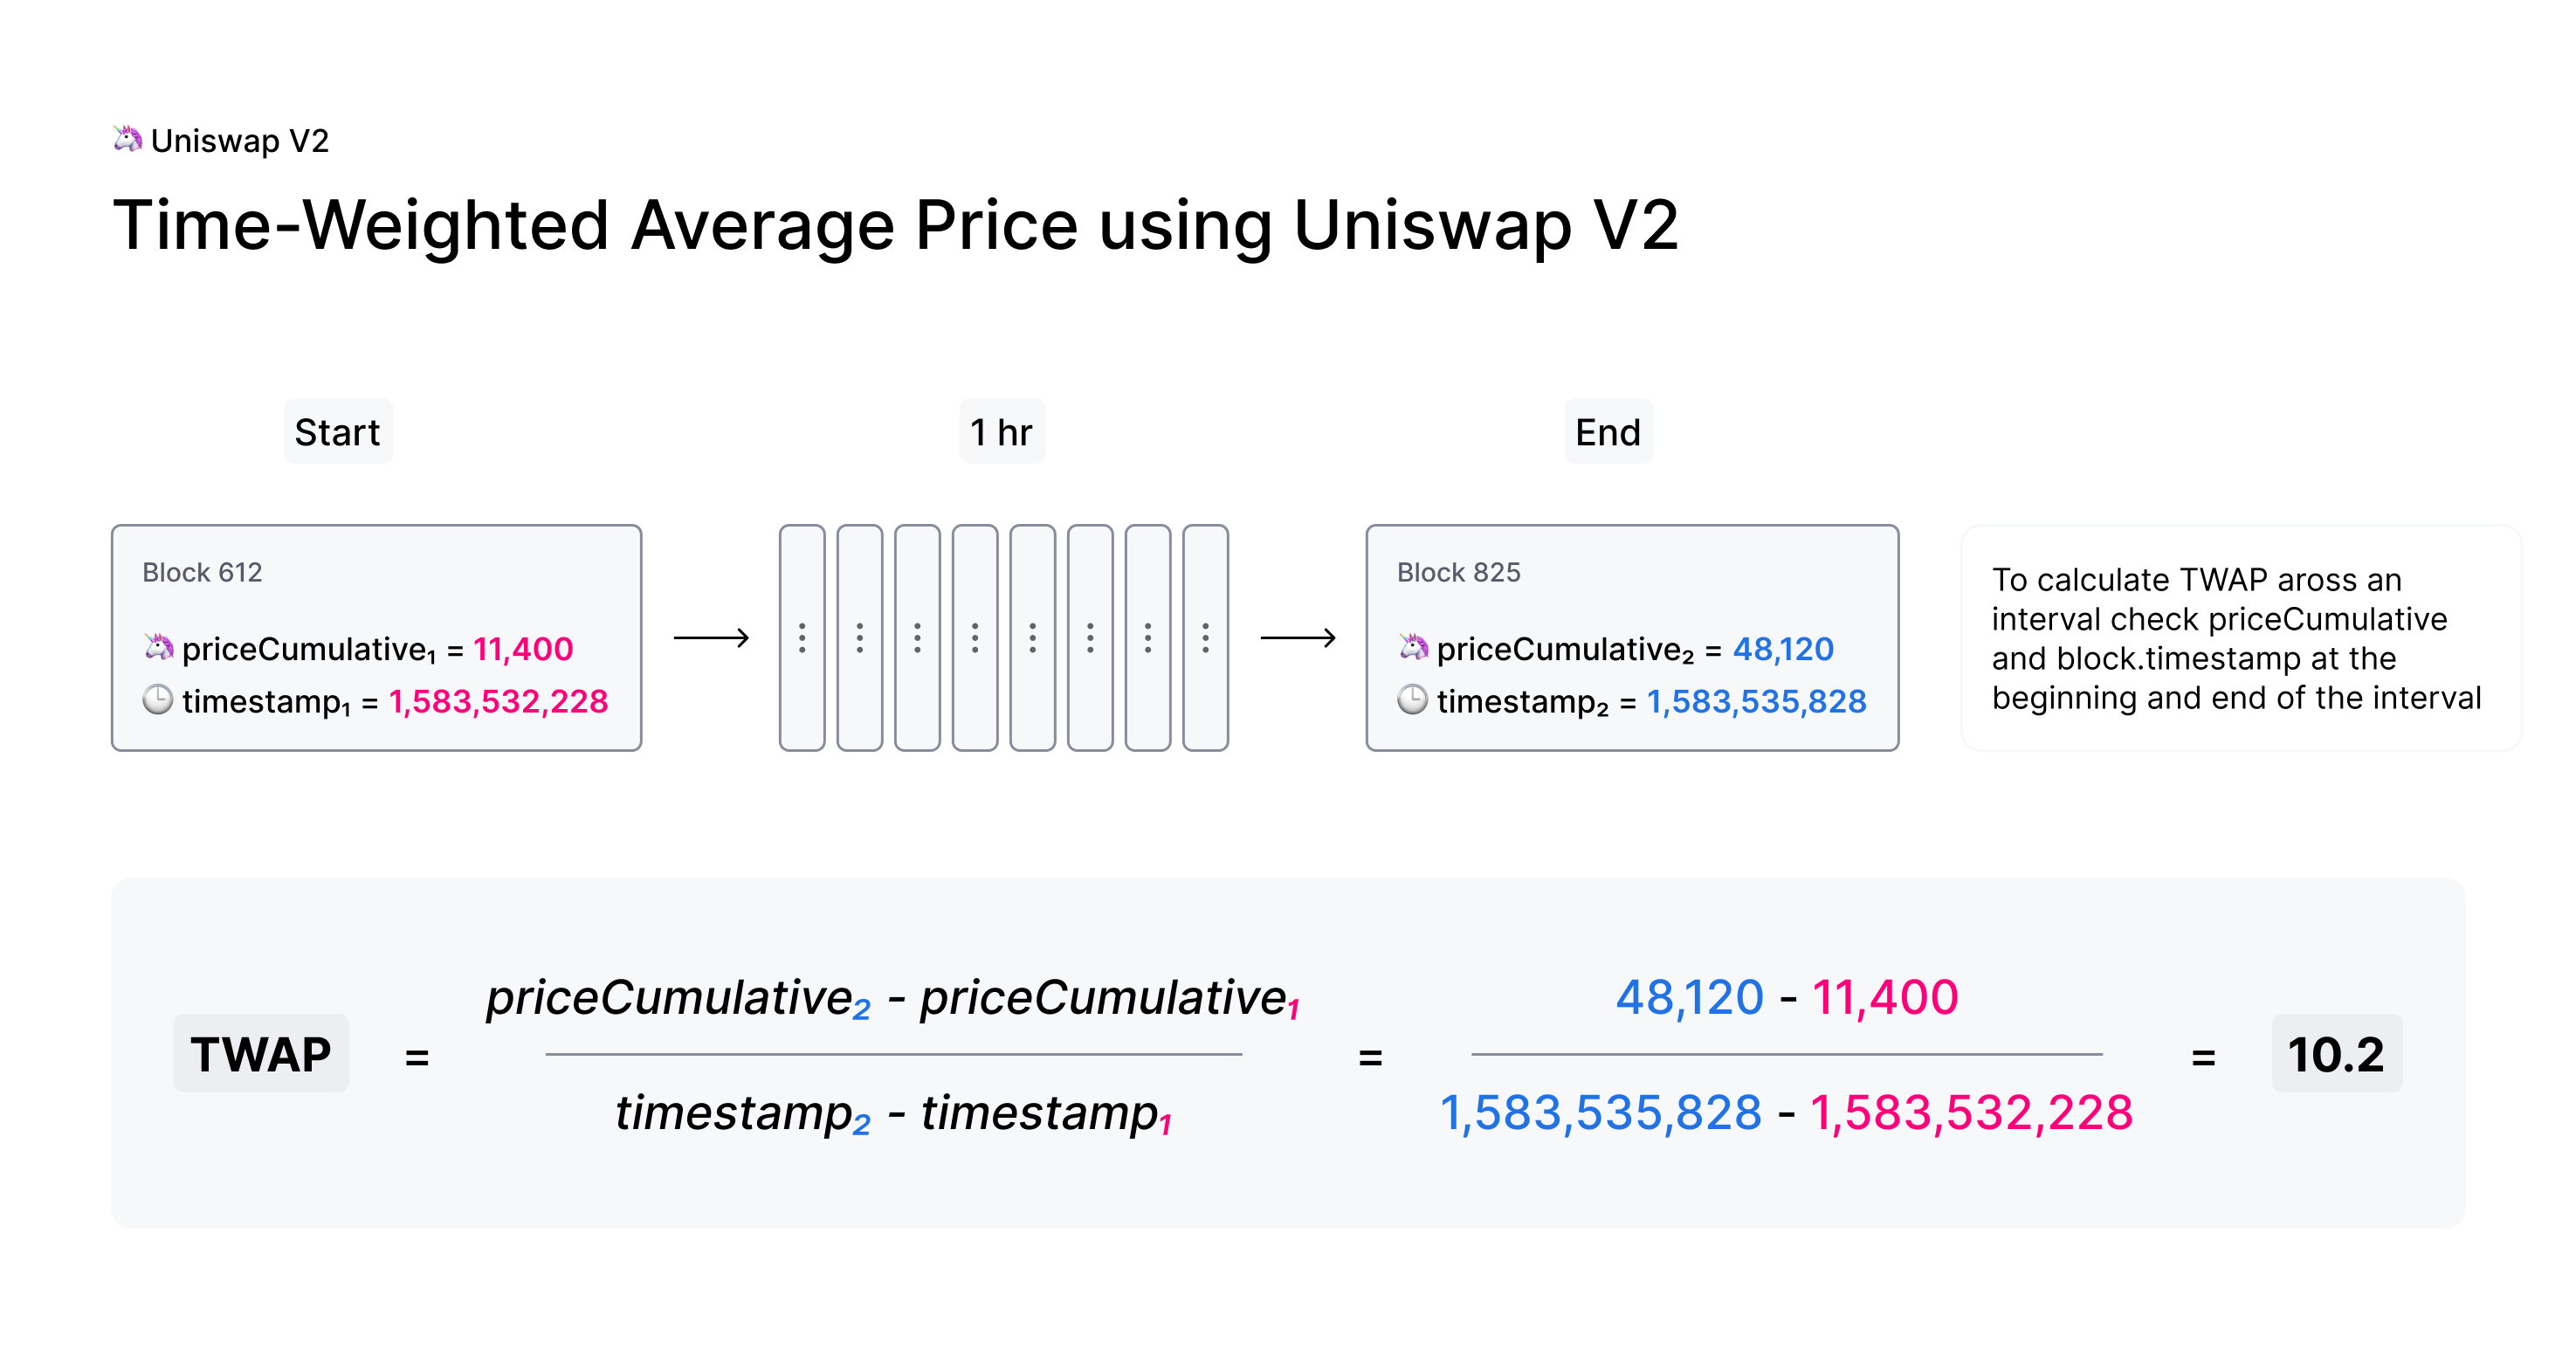
Each time the price changes, it multiplies the previous price by the time period during which that price is valid as the weight of the price. The summation of the results are accumulated in the priceCumulativeLast which is divided by the total time period resulting in the time-weighted average. Uniswap stores and provides the necessary data for this calculation.
The following diagram illustrates how this process works. To get more information, see here.
This is how the Uniswap method is implemented: The time-weighted average can be calculated by dividing the difference of these variables by the blocks’ time difference.
const period = new BN(to.timestamp).sub(new BN(seed.timestamp)).abs()

return {
    price0: new BN(price0CumulativeLast).sub(new BN(seedPrice0CumulativeLast)).div(period),
    price1: new BN(price1CumulativeLast).sub(new BN(seedPrice1CumulativeLast)).div(period),
    blockNumber: seedBlock
}
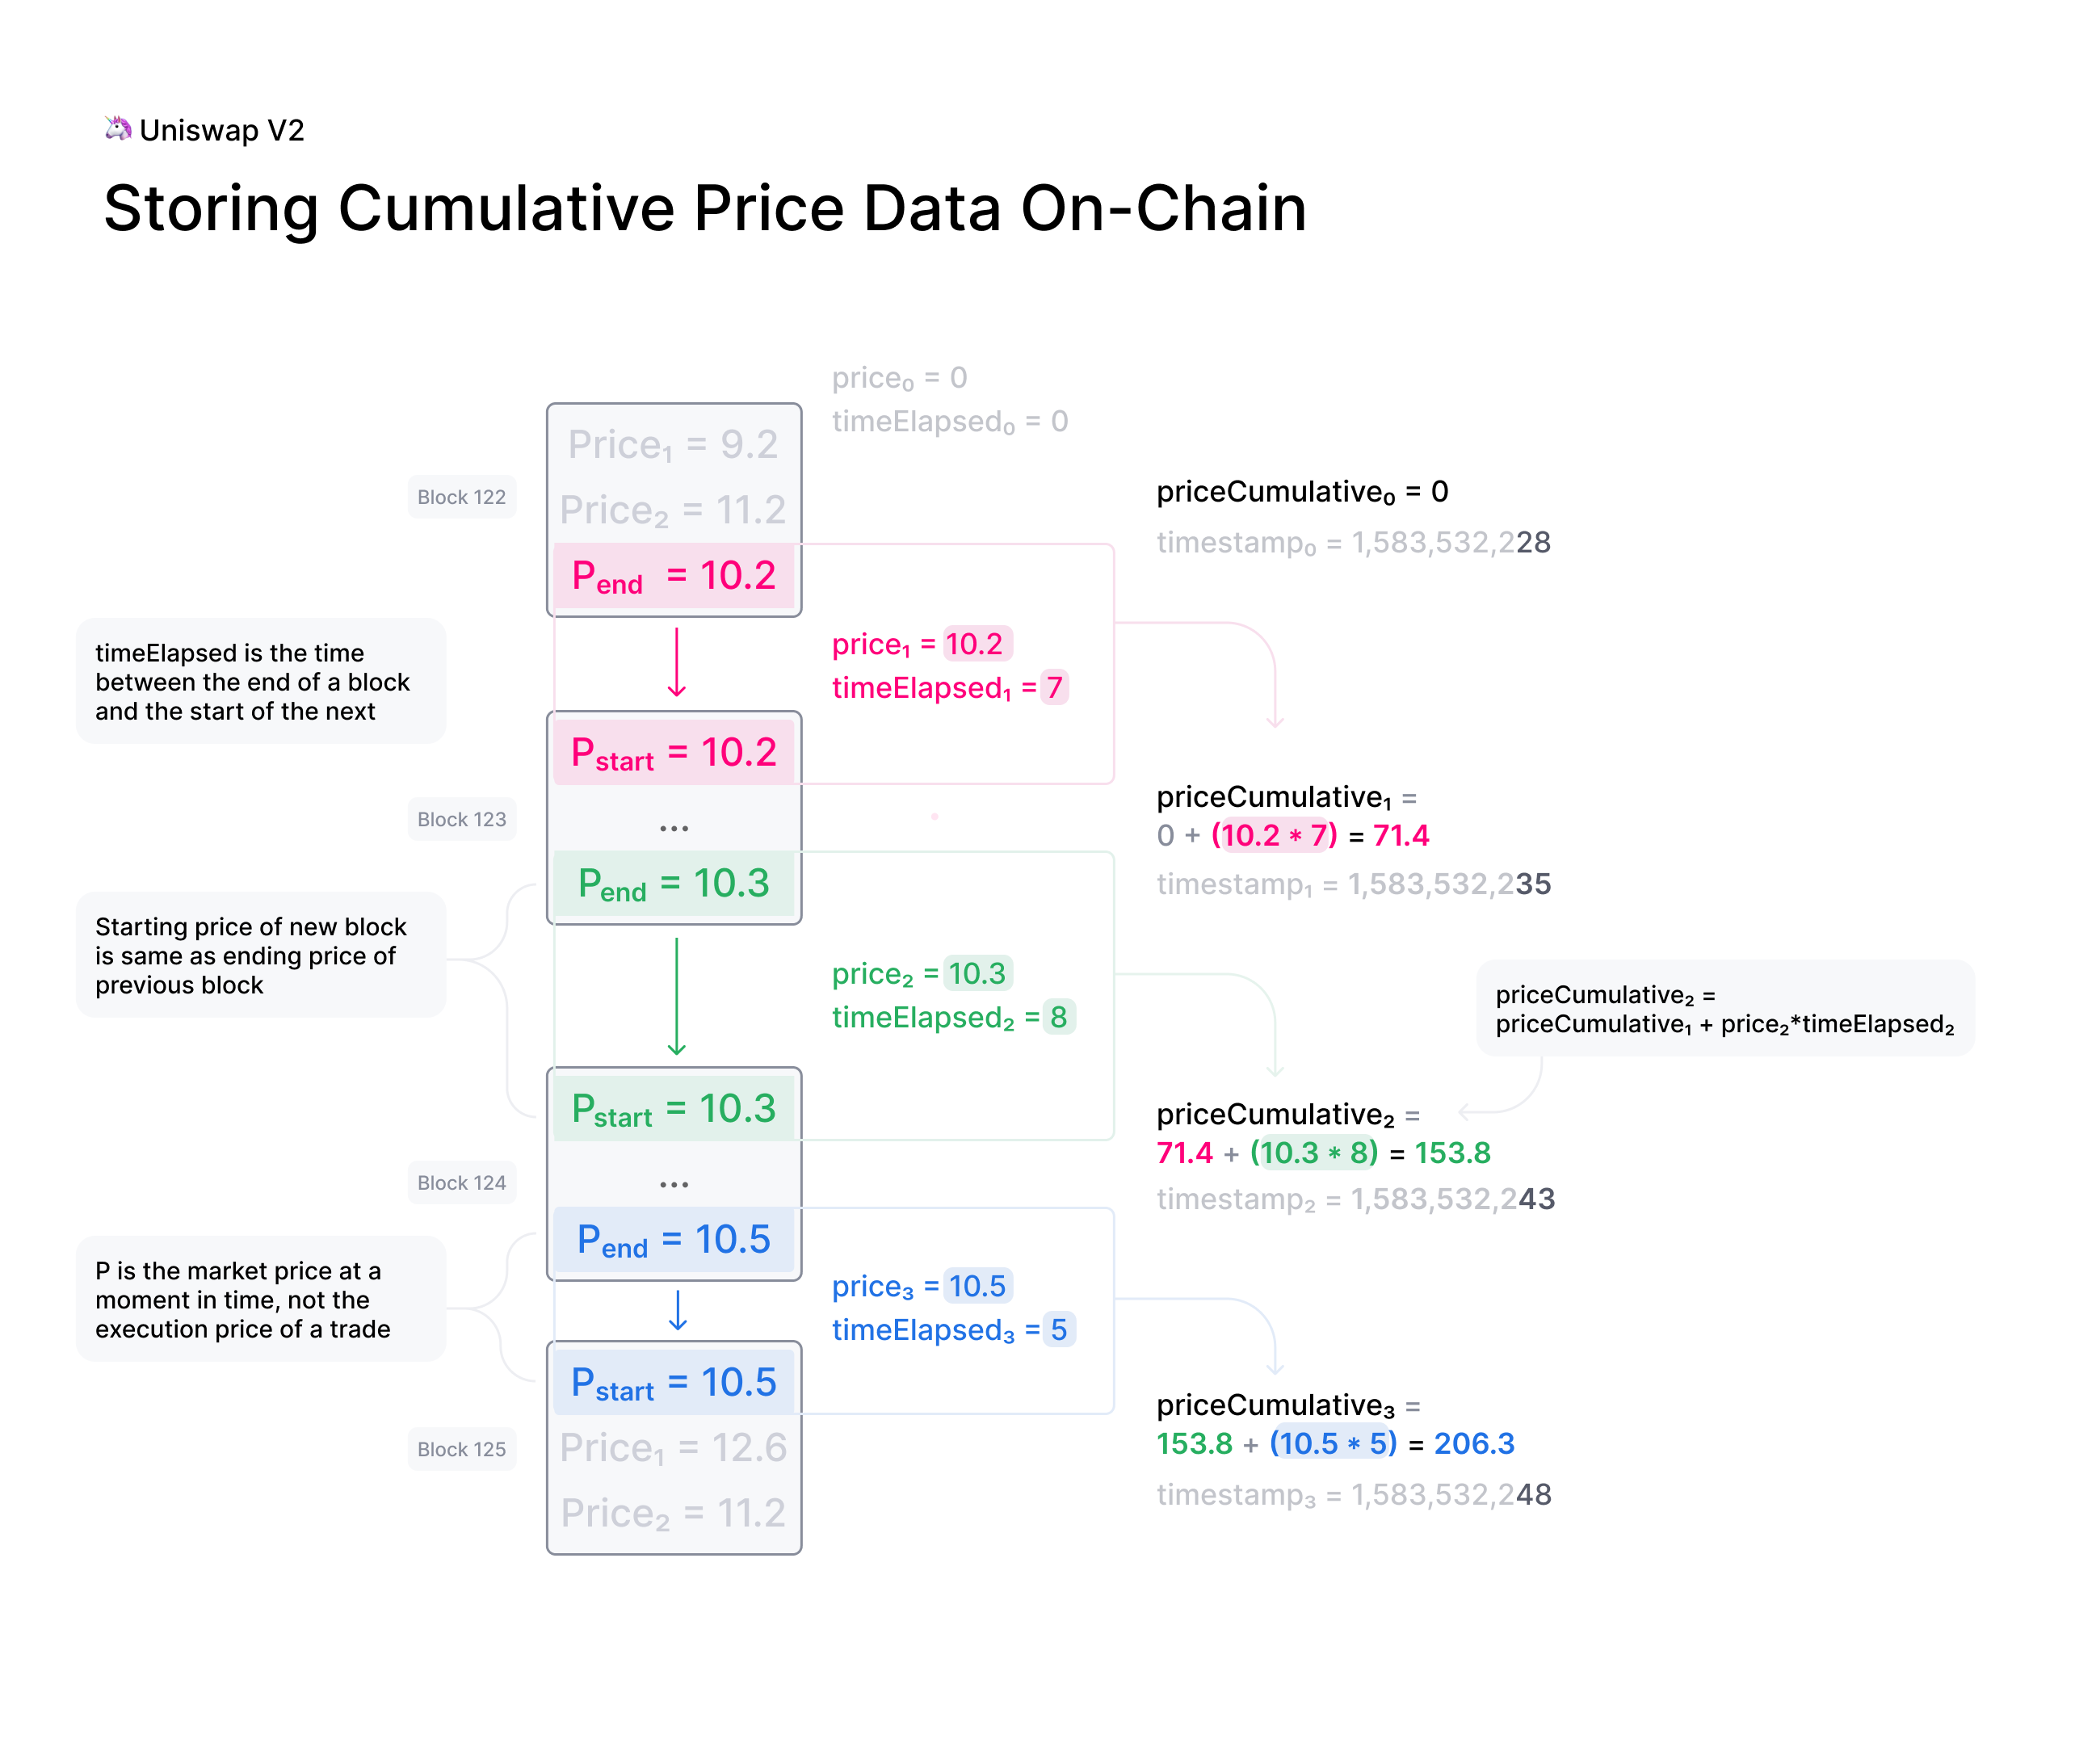
Updating priceCumulativeLast
If we are to calculate TWAP for a specified time period, for instance the last 24 hours, it seems that the difference between priceCumulativeLast for the current and starting blocks should be divided by 24 hours. In reality, however, the priceCumulativeLast is only updated with each swap, so when this variable is queried for a block, its value may belong to a few blocks earlier, that is, the block when a swap took place. To obtain the accurate value of the variable for a block, the block price should be multiplied by the time period between the last swap and block, and the result should be added to the value of priceCumulativeLast from the last swap.
updatePriceCumulativeLasts: function (_price0CumulativeLast, _price1CumulativeLast, toBlockReserves, toBlockTimestamp) {
    const timestampLast = toBlockTimestamp % 2 ** 32
    if (timestampLast != toBlockReserves._blockTimestampLast) {
        const period = new BN(timestampLast - toBlockReserves._blockTimestampLast)
        const price0CumulativeLast = new BN(_price0CumulativeLast).add(this.calculateInstantPrice(toBlockReserves._reserve0, toBlockReserves._reserve1).mul(period))
        const price1CumulativeLast = new BN(_price1CumulativeLast).add(this.calculateInstantPrice(toBlockReserves._reserve1, toBlockReserves._reserve0).mul(period))
        return { price0CumulativeLast, price1CumulativeLast }
    }
    else return { price0CumulativeLast: _price0CumulativeLast, price1CumulativeLast: _price1CumulativeLast }
},
Obtaining the Pair Price
All the procedures explained above in a step-by-step manner can now be reviewed in the implementation of calculatePairPrice function.
The price of the starting block for the period for which the average is to be calculated is obtained by
getSeedfunction.The list of
Syncevents for the period is obtained by thegetSyncEventsfunction.The price list is generated by the
createPricesfunction.Any outliers are removed using
removeOutlierfunction.The average price is calculated through
calculateAveragePricefunction.The fuse mechanism is triggered by the
checkFusePricefunction if there is a large difference between the short and long-term averages.
calculatePairPrice: async function (chainId, abiStyle, pair, toBlock) {
    const blocksToSeed = networksBlocksPerMinute[chainId] * pair.minutesToSeed
    const blocksToFuse = networksBlocksPerMinute[chainId] * pair.minutesToFuse
    // get seed price
    const seed = await this.getSeed(chainId, pair.address, blocksToSeed, toBlock)
    // get sync events that are emitted after seed block
    const syncEventsMap = await this.getSyncEvents(chainId, seed.blockNumber, pair.address, blocksToSeed)
    // create an array contains a price for each block mined after seed block
    const prices = this.createPrices(seed, syncEventsMap, blocksToSeed)
    // remove outlier prices
    const { outlierRemoved, removed } = this.removeOutlier(prices)
    // calculate the average price
    const price = this.calculateAveragePrice(outlierRemoved, true)
    // check for high price change in comparison with fuse price
    const fuse = await this.checkFusePrice(chainId, pair.address, price, pair.fusePriceTolerance, blocksToFuse, toBlock, abiStyle)
    if (!(fuse.isOk0 && fuse.isOk1)) throw { message: `High price gap 0(${fuse.priceDiffPercentage0}%) 1(${fuse.priceDiffPercentage1}%) between fuse and twap price for ${pair.address} in block range ${fuse.block} - ${toBlock}` }

    return {
        price0: price.price0,
        price1: price.price1,
        removed
    }
},
Calculating TWAP of Routes
Very often, the dollar-based price of a token cannot be obtained from a pair because many of the important pairs do not contain stablecoins; that is, both tokens are volatile. For instance, on mainnet, numerous pools with large liquidity for many tokens have WETH as their counterpart. The same goes for tokens on other chains and their native tokens. That is why to get the dollar-based price of a token, we usually need to calculate the price of a route of pairs.
Imagine there is a pair between token A and WETH, and the price of A is 0.02 in terms of WETH. There is also a pair between WETH and USDC, and the price of WETH is, for example, 1,500 in terms of USDC. Therefore, we can get the price of A in terms of USDC by multiplying the prices of the two pairs in the route, which comes to $30.
Our price feed app, TWAPER, makes use of the module explained in section 1 to calculate the price of a pair.
module.exports = {
    ...Pair,

    APP_NAME: 'twaper',
    ...
},
Calculating Prices of Routes
To calculate the TWAP of a route, the prices of pairs forming it should be calculated.
Instead of calculating the price for each pair separately, we obtain all the prices for the pairs of all routes asynchronously through Promise.
const promises = []
for (let [i, route] of routes.entries()) {
    for (let pair of route.path) {
        promises.push(this.getTokenPairPrice(route.chainId, route.abiStyle, pair, toBlocks[route.chainId]))
    }
}

let result = await Promise.all(promises)
At this stage, the TWAP of a route is calculated by multiplying the prices of pairs together.
let price = Q112
...
for (let pair of route.path) {
    price = price.mul(result[0].tokenPairPrice).div(Q112)
    ...
}
Now that the price of a token for one single route is calculated, we can calculate the time weighted price average for different routes based on the weights read from config, which will be described in the next section. These routes may be on one exchange or different exchanges on one chain or even different exchanges on different chains.
calculatePrice: async function (validPriceGap, routes, toBlocks) {
    let sumTokenPrice = new BN(0)
    let sumWeights = new BN(0)
    let prices = []
    const removedPrices = []
    ...
    for (let route of routes) {
        let price = Q112
        ...
        for (let pair of route.path) {
            price = price.mul(result[0].tokenPairPrice).div(Q112)
            routeRemovedPrices.push(result[0].removed)
            result = result.slice(1)
        }

        sumTokenPrice = sumTokenPrice.add(price.mul(new BN(route.weight)))
        sumWeights = sumWeights.add(new BN(route.weight))
        prices.push(price)
        removedPrices.push(routeRemovedPrices)
    }
    ...
    return { price: sumTokenPrice.div(sumWeights), removedPrices }
},
When there are several routes and there is a big difference between the obtained maximum and minimum prices, we have implemented another fuse mechanism to stop the system.
if (prices.length > 1) {
    let [minPrice, maxPrice] = [BN.min(...prices), BN.max(...prices)]
    if (!this.isPriceToleranceOk(maxPrice, minPrice, validPriceGap).isOk)
        throw { message: `High price gap between route prices (${minPrice}, ${maxPrice})` }
}
Loading the Configuration
There is a question of where and how the required configurations for the price calculation is obtained; configurations such as which routes are used and which pairs are the routes composed of. To define the required configuration, the ConfigFactory smart contract is used. The ConfigFactory generates a contract which should be fed the necessary parameters.
For more detailed information about ConfigFactory see here. The verified deployment of this contract on Fantom can be seen here.
The ConfigFactory has a method called deployConfig that enables users to deploy new Config instances for their tokens’ configurations. Each Config has a setter and a validPriceGap that defines the maximum allowed price difference between the routes. The Config contract has an addRoute method that enables the setter to add a route to the Config. A route has a chain ID, a dex, a weight, and a list of pairs. Each pair has a specified period for average calculation, a long-term period and an accepted tolerance for the fuse mechanism, and a reverse flag that specifies whether to use the price of token0 or token1 of the pair. Every config deployment has an address that our app uses to load the required configuration from by calling getRoutes function.
getRoutes: async function (config) {
        let configMetaData = await ethCall(config, 'getRoutes', [], CONFIG_ABI, CHAINS.fantom)
        return this.formatRoutes(configMetaData)
},
Calculating the TWAP of an LP Token
The TWAPER makes use of the following formula to calculate the TWAP of an LP token.
In the formula, p0 and p1 are the fair prices of the two tokens that the LP represents and are obtained in the method described in section 2; K is a constant that is the result of multiplying the reserves of the two tokens and L is the LP’s total supply. The values for K and L are obtained from the LP’s contract. More details about this formula can be found in the Pricing LP Tokens article.
By using Promise and calculatePrice, values for price0 and price1 are calculated simultaneously. K and L are read from the LP’s smart contract. Having obtained these values, the TWAPER can now calculate the TWAP of the LP.
calculateLpPrice: async function (chainId, pair, routes0, routes1, toBlocks) {
        // prepare promises for calculating each config price
        const promises = [
            this.calculatePrice(routes0.validPriceGap, routes0.routes, toBlocks),
            this.calculatePrice(routes1.validPriceGap, routes1.routes, toBlocks)
        ]

        let [price0, price1] = await Promise.all(promises)
        const { K, totalSupply } = await this.getLpTotalSupply(pair, chainId, toBlocks[chainId])

        // calculate lp token price based on price0 & price1 & K & totalSupply
        const numerator = new BN(2).mul(new BN(BigInt(Math.sqrt(price0.price.mul(price1.price).mul(K)))))
        const price = numerator.div(totalSupply)
        return price
    },
Like regular tokens, LP tokens have a config that includes routes for token0 and token1. The config is obtained by calling getMetaData function from the LpConfig contract. To deploy LpConfig, the function deployLpConfig is called from ConfigFactory. More details can be found here.
Handling the Request
Now that all the different components of the app have been explained in a step-by-step manner, it is time to review the implementation of the onRequest function that is the entry point of requests to the Muon app.
The first action is to determine which method - price or lp_price - is to be used. Regardless of the method, the two parameters should be sent to the app: the contract address from which the config loads, and the toBlocks for which the average is to be calculated.
onRequest: async function (request) {
    let {
        method,
        data: { params }
    } = request

    switch (method) {
        case 'price':

            let { config, toBlocks } = params
            ...

        case 'lp_price': {
            let { config, toBlocks } = params
            ...
        }

        default:
            throw { message: `Unknown method ${params}` }
    }
},
The toBlocks parameter is optional and if it is not sent to the app, it means the price for the current block should be calculated.
// prepare toBlocks
if (!toBlocks) {
    if (!request.data.result)
        toBlocks = await this.prepareToBlocks(chainIds)
    else
        toBlocks = request.data.result.toBlocks
}
else toBlocks = JSON.parse(toBlocks)
However, as the latest block may be reorged and we need to assure all nodes are using the same block, we apply a number of blocks for confirmation; that is, rather than assigning the current block to the toBlock, a block that is a few blocks before the current one is assigned.
getReliableBlock: async function (chainId) {
    const latestBlock = await ethGetBlockNumber(chainId)
    const reliableBlock = latestBlock - blocksToAvoidReorg[chainId]
    return reliableBlock
},

prepareToBlocks: async function (chainIds) {
    const toBlocks = {}
    for (let chainId of chainIds) {
        // consider a few blocks before the current block as toBlock to avoid reorg
        toBlocks[chainId] = await this.getReliableBlock(chainId)
    }

    return toBlocks
},
Method: price
If the method is price, the function getRoutes is called to obtain routes & chainIds.
const { routes, chainIds } = await this.getRoutes(config)
With routes and toBlocks, the price average of different routes are calculated using calculatePrice, as explained above.
const { price, removedPrices } = await this.calculatePrice(routes.validPriceGap, routes.routes, toBlocks)
Finally, the timestamp at which the price is calculated should be returned to the app. This enables the app to ensure that the price is not an expired one.
// get earliest block timestamp
const timestamp = await this.getEarliestBlockTimestamp(chainIds, toBlocks)

return {
    config,
    routes,
    price: price.toString(),
    removedPrices,
    toBlocks,
    timestamp
}
Because routes are on different chains and are assigned to different toBlocks, the earliest timestamp is returned.
getEarliestBlockTimestamp: async function (chainIds, toBlocks) {
    const promises = []
    for (const chainId of chainIds) {
        promises.push(ethGetBlock(chainId, toBlocks[chainId]))
    }

    const blocks = await Promise.all(promises)
    const timestamps = []
    blocks.forEach((block) => {
        timestamps.push(block.timestamp)
    })
    return Math.min(...timestamps)
},
Method: lp_price
If the method is lp_price, the function getLpMetaData is called to obtain the chainId, pair, config0 & config1.
let { chainId, pair, config0, config1 } = await this.getLpMetaData(config)
The variables config0 & config1 should be changed to routes0 & routes1 as follows so that they can be used by calculateLpPrice.
let { routes: routes0, chainIds: chainIds0 } = this.formatRoutes(config0)
let { routes: routes1, chainIds: chainIds1 } = this.formatRoutes(config1)
Now that routes for token0 and ``token``1 are obtained, the LP price can be calculated.
const price = await this.calculateLpPrice(chainId, pair, routes0, routes1, toBlocks)
Here, the same points apply to the timestamp as the other method except for the return values, as shown below:
// get earliest block timestamp
const timestamp = await this.getEarliestBlockTimestamp(chainIds, toBlocks)

return {
    config,
    price: price.toString(),
    toBlocks,
    timestamp
}